Building a Mold using a 9.4T MRI scan of the MTL
In this tutorial, we address a harder task, where the MRI scan of the MTL specimen is on a 9.4T scanner and has distortions that require correction. For this, we will use a 7T MRI scan of the whole hemisphere (without distortions) as a reference. This requires additional steps of registering the 9.4T MRI to the 7T MRI.
Step 1. Download Input MRI Scans
Create a new folder for each mold-making project. All files should be saved in this folder.
The first required input to this protocol is the 9.4T MRI scan of the entire MTL, which should be converted to the NiFTI file format and saved as named
mtl_94t.nii.gz. Note that this is not the overnight high-resolution scan, but a shorter scan that covers the entire sample.The second required input to this protocol is the 7T MRI scan of the hemisphere, which should be converted to the NiFTI file format and saved as named
hemi_7t.nii.gz.
Step 2. Segment the specimen on the 9.4T scan
Open the 9.4T scan as the main image in ITK-SNAP. Adjust contrast so the image is visible well.
Segment the specimen using the same way as in Step 2 of Building a Mold using a 7T MRI scan of the MTL, but with the following important differences:
Because the 9.4T MRI scan is anisotropic (voxel dimensions in x,y and z are different), we need to make it isotropic by resampling. Before pressing the Segment 3D button in ITK-SNAP, check the Resample ROI box, and in the dialog that pops up, select Presets->Supersample to Isotropic
When you save the contour, name it
contour_image_94t.nii.gz.After you save the contour and press the Finish button (return to main ITK-SNAP mode), save your segmentation image (Segmentation->Save Segmentation Image) and name it
mtl_mask_94t.nii.gzAfter you finish this step, keep the images loaded in ITK-SNAP
Step 3. Rigid/Affine registration of the hemisphere 7T to the MTL 9.4T
With the 9.4T MRI and the segmentation still loaded in ITK-SNAP, load the 7T hemisphere scan as an additional image (File->Add Another Image…)
Enter the registration mode (Tools->Registration). Select the Manual tab.
Rotate and move the hemisphere image until it roughly aligns with the MTL image.
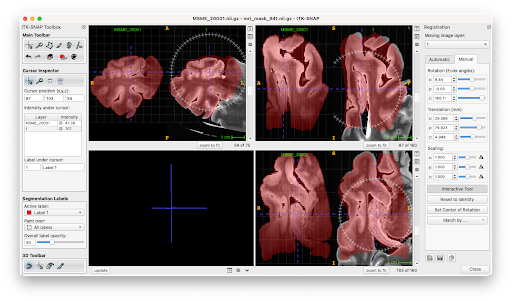
Use the button at the bottom of the registration panel (floppy disk icon) to save the current registration parameters. Call the file
initial.mat. Make sure that the file is saved to the same folder where the rest of the mold files are located.Select the automatic tab. Make sure the selected options are Rigid for transformation model, Cross-correlation for image similarity metric, and Use segmentation as mask is selected. Under multi-resolution schedule, select 4x for coarsest and 1x for finest.

Press Run Registration. Confirm that the registration gets better visually, not worse. * If the registration gets worse after this step, try using a different set of initial registration parameters by rotating/moving the 7T MRI manually.
Save the current registration parameters as
rigid.matSelect Affine under the transformation model, and run registration again. If it does not get worse, save as
affine.mat. * If it does get worse, reload the rigid registration parameters and just save them again asaffine.mat. * If all goes well, you should see a registration result like this: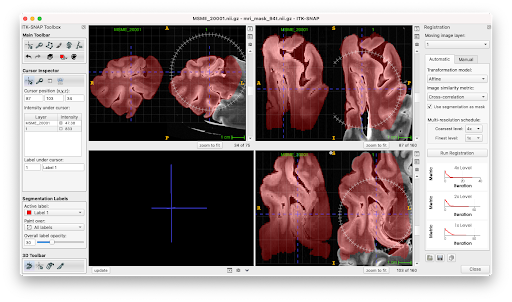
Step 4. Deformable registration of the hemisphere 7T to the MTL 9.4T
Open a terminal window. Make sure that the directory containing mold_helper.sh is in your PATH. You can do this by typing:
PATH=/home/user/.../path/to/mold_helper:$PATH
export PATH
Change directory to the folder containing your files:
cd /home/user/.../workdirPerform deformable registration by running this command, which should take a few minutes to run.
mold_helper.sh reg_mtl_to_hemi
Open a new ITK-SNAP. Load
hemi_7t.nii.gzas the main image, and the newly created imagemtl7t.nii.gzas an additional image. Configure ITK-SNAP to displaymtl7t.nii.gzas a semi-transparent overlay, and adjust the color map and transparency similar to the screenshot below. Check that the registration between the two images is good visually.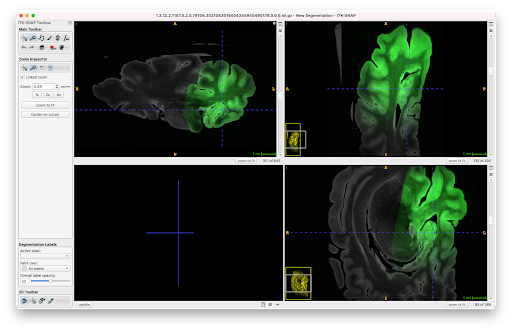
Save the ITK-SNAP workspace as
INDD123456_mtl2hemi.itksnap
Step 5. Generate a Mold
Proceed to Step 3 in Building a Mold using a 7T MRI scan of the MTL and complete all the remaining steps. Use the same working folder and save all the files generated above together with the files generated during mold creation.